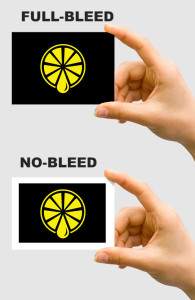
What is Full-Bleed Printing

This term refers to any artwork that extends to the edge of the page. Whether it’s a photo or background, if ink touches any edge of the final print, you need a bleed. Full-bleed refers to when artwork touches all four sides such as a colored background; partial-bleed is when only 1-3 edges are touched.
Professional printers usually print multiple copies of an image on large sheets of paper and then trim them down to the correct size. For example, letter-size documents are printed 2-up on 12×18 sheets and then trimmed down to 8.5×11. However, paper is finicky. It grows, shrinks, or warps from the humidity in the air and each sheet in a package can have different levels of change. This means the print on any given page can shift in any direction up to a tenth of an inch compared to other sheets in a stack. If your 8.5×11 document was designed only to 8.5×11, this shifting could result in 0.1″ of white space on one or two edges of some of the prints. Clearly not what we want!
How to achieve Full-Bleed Printing in two steps:

Extend the Bleed
- Keep all backgrounds and photos continuing past the intended edge of the page for 1/8th of an inch.
- If your design software does not support bleed margins, make the file size 0.25″ larger than your final piece with the intention of the outer 0.125″ edges being trimmed off.
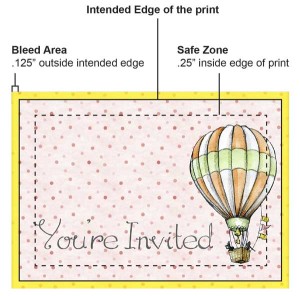
To avoid this white space, you must extend your bleed beyond the finished edge of the page for at least 1/8th of an inch (sometimes more for larger pieces). This is called the bleed area. An 8.5×11 document has a bleed area of 8.75×11.25”. A 4×6” postcard has a bleed area of 4.25×6.25”. All background colors and photos that bleed off the edge will need to continue to the full bleed area in the design. This means any image that bleeds to the edge of the page must have at least 0.125” trimmed off its outside edge. Make sure you select images that have unimportant space along the edges so nothing important will be trimmed off.
Safe Zones
- Keep all borders and important text 1/4th of an inch inside the intended edge of the page.
Shift happens both ways! If that 0.1″ shift caused some white space to appear on one side of the print, that means 0.1″ of the opposite edge is now outside where the trim is going to be! Therefore commercial printers recommend safe zones. The safe zone is smaller than the final print size by generally twice the distance from the edge of the page as the bleed margin. So if the bleed margin is 0.125″ outside the edge, the safe zone will be 0.25″ inside the edge. That same 8.5×11″ document has a safe zone of 8×10.5″. Keep all important text and artwork at least this far away from the edge of the finished print. The distance from the edge is larger for the safe zone than the bleed area to keep things looking centered even if some shifting occurs.
Is that all?
That’s the bare minimum to design for successful full-bleed printing. To help ensure a perfect print, include trim marks in your file but only if you have the know-how. These are easily created if you are designing with professional software like the Adobe Creative Suite. Check with Adobe help forums to learn how to do that or drop us a line and we’ll be more than happy to answer your questions. If you aren’t sure how to make a crop mark, don’t worry. Just make sure your file is set to the correct size and let us know what the intended size is going to be. Our file prep software can add in those marks for you.
Helpful Resources
Setting a bleed in InDesign CC – Adobe Help
